
When cool Node-Red logic is not enough... A short note to explain the pitfall of switching (pun intended) light control logic from "toggle" to specific "on/off" actions without thinking it through! The "not enough" comment is misleading, it should have read "When not enough cool Node-Red logic is not enough... Let's read on and see if we can spot the "D'Oh!" moment.
Introduction
I have a number of Philips Hue “dimmer switches” some of which control Hue bulbs directly through a local Hue Hub. This a historic situation that I’m not bothering to change as it adds some resilience should I break something in the more interesting smart lighting which is the topic of this post. I also have some Hue switches which are connected via Zigbee2MQTT and control lights through Home Assistant and Node-Red and which I recently broke… This post, through a minor backstory detour explains what I tried to do, why it worked but was actually “brittle”, why it eventually broke, and how I fixed and improved it.
The Backstory
If you’ve ever read a post over on NotThe.Blog you’ll be expecting a link, right about now, to jump to The wrap up..
I installed a couple of Govee Floor Lamps to provide ambient lighting in a room which only has super-bright ceiling lights. I added the lights using local Bluetooth and connected them (over WiFi) to my IoT VLAN.
That’s when I learned that the Home Assistant Core Govee Lights Local integration relies on some UDP Multicast magic which the lights use to advertise their presence on the “network”. Unfortunately, most firewalls and L3 switches don’t forward this between networks/VLANs not even the ones which support mDNS. The best solution I found was for a firewall I don’t run (pfSense or opnSense) that involved a plugin and some specific configuration. It seemed that even though mDNS was needed for “discovery”, the actual operation of the lights didn’t need it. Lots of people had asked about manually adding the IP addresses of lights, but, at the time of writing this wasn’t possible
Further Googling seemed to suggest that most people in this situation switched to the HACS Govee2MQTT addon which, as the name suggests, speaks “Govee” on the (WiFi) network, and forwards the results to MQTT, while relaying commands in the opposite direction. If you’ve used Zigbee2MQTT the concept should seem familiar, and as a pre-requisite for Z2M is a local MQTT Broker (like the Mosquitto add-on in the Home Assistant store), if you have that already, as I did, Govee2MQTT will happily use the existing broker.
That’s what I did and it all worked fine. Once I’d got it working, I decided to change it. 🙄 Well, actually, in my defence, I decided to rename the lights so they were more consistent with the other MQTT delivered devices Home Assistant auto-discovered. Long story short, things broke and I ended up restarting and recreating the Govee2MQTT and my Mosquitto Broker, and although everything seemed to work okay, some of the existing Zigbee switches no longer seemed to be able to control their appointed lights… 🤦
Crawl, walk, run…
Here’s a brief history of the evolution of the Node-Red flows which manage lights like this, how I “made them better”, why this was, as an old colleague of mine used to say, a “negative enhancement”, and how, once I’d slapped myself on the forehead for not spotting it earlier, I added a simple fix. The examples use a group of LED panels on the kitchen ceiling.
Crawl - how it started out.
Initially I kept it simple. You click the button and the lights change state. I have an Aqara wired switch at one side of the room and a matching Aqara wireless switch (covering the old 2-way switch) at the other side of the room. Not shown in the diagram are the two Zigbee2MQTT-In nodes, and associated Node-Red “switch” nodes which collect the button presses and decide where to send each action. The on/off actions in this case connect to Link-Out nodes which connect to the common Link-In nodes you can see in each screenshot.

This is pretty straight forward. If the lights are on they go off, if they’re off they turn on. Simples…
Walk - and why it broke.
These LED panels and some recessed ceiling lights that were also affected have “tunable” white LEDs in them. The panels are RGB too, but that’s for holidays and alarms. I wanted the lights to come on at different temperatures at different times of the day. If I could get that to work, I could add more logic. So, if the ceiling was on and cool-white, the under-cabinet LEDs would come on the same. If the under-cabinet lights where bright, mid-white, the ceiling lights would come on and match them.
The first step of this was to take a single action “button press” and decide if this was going to turn the lights on or off. For that we need the current state. If you’re relatively new to Node-Red, you might have seen the Home Assistant “Current State” node. This gets, well, the current state of an object from the connected Home Assistant. We could then send the state returned by that, in the message payload (or wherever it landed in the message) to a “Switch” node. In the Switch node we’d identify the output routing by matching the state, one for State = “on” and one for State = “off”.
For a slightly more elegant version of that, we can have the Switch node query the state of the Home Assistant entity (the light in this case) itself. Because, while the Current State node is easier to visualize, the Switch node, as well as querying the contents of the msg.payload and other message properties, can also query the Node-Red Global context data which conveniently holds a copy of every entity’s state. So, having the “Switch” node match:
global.homeassistant.<HA Instance_Name>.states["light.zgrp_kitchen_panels"].state
Like this: (where in my case “zgrp_<whatever>” signifies a Zigbee group)
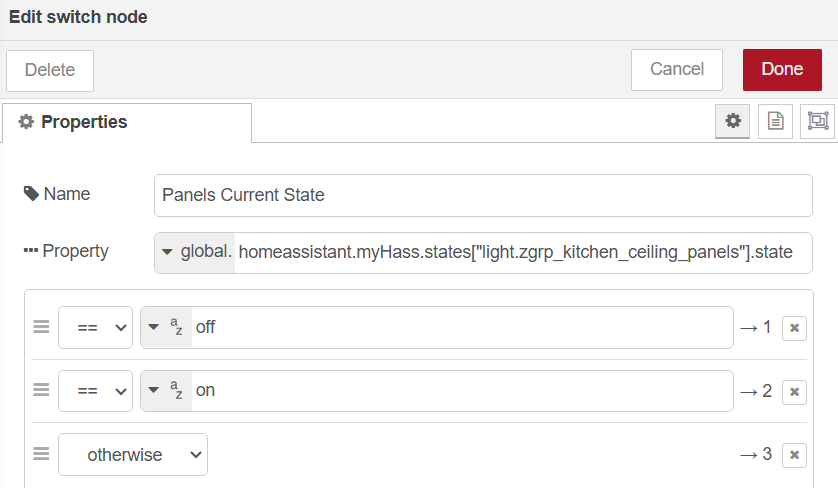
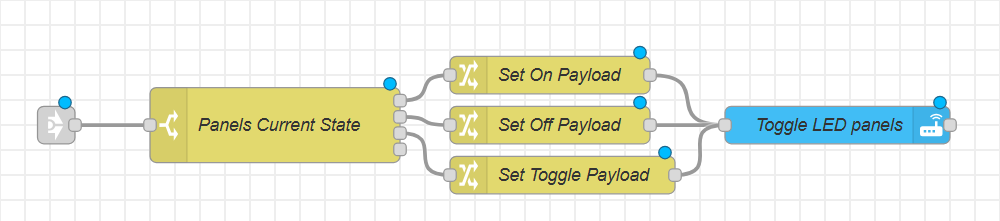
Allows the flow to look like this.

We could have two separate “Action” nodes, one for on, and one for off, but using the “Change” node to override/set the Action node’s parameters first allows more flexibility in the smart turning on that was the goal of this over-engineered mess. Once the msg.payload is set to {"action": "turn_on"} (or "turn_off"), the same blue Home Assistant “Action” node will do whichever action is passed to it. We can also add a brightness level or colour temperature in the “Set On Payload” (Change) node for that smart turning on action.
You’ll see from the two images above, that I also added an “otherwise” exit from the Switch node. I had in mind we should watch for weirdness, but I was thinking about “unavailable” being the likely candidate there and I’d play some announcement about the “Kitchen lights are unavailable, please check their power etc.” over the speakers.
The “D’Oh!” moment…
What I didn’t account for (over and above not implementing any error catching) was what would happen if somebody deleted the MQTT Broker’s container and rebuilt a new one. At that point, the state of the light would become “unknown”. My simple two-state logic couldn’t handle this, and went something like “Is the light ‘on’? Nope. Okay, is the light ‘off’? Nope. Well, I got nothin… ” and didn’t turn the lights on, or off! When I used the Home Assistant app to turn the lights on, the MQTT state got populated (with “on”, unsurprisingly) and from that point the two-state logic was back in business.
But, there’s no saying some idiot won’t do the same thing to the MQTT broker again at some point, so this situation needs fixing before I do it… err… it happens again.
Run - how it is (hopefully) more robust now.
As I noted earlier, if the light or group’s status is unavailable, it probably means the device(s) are un-reachable, so the control logic doesn’t matter if the we can’t control the light anyway. It would be good practice to do something with that information, like an announcement, rather than just leaving the user confused, but we’ll leave that for another post/note.
Let’s fix the “unknown” issue before the idiot who broke it last time does it again… In this case, while having a status of “unknown” doesn’t guarantee we can actually control the light, we might as well try.
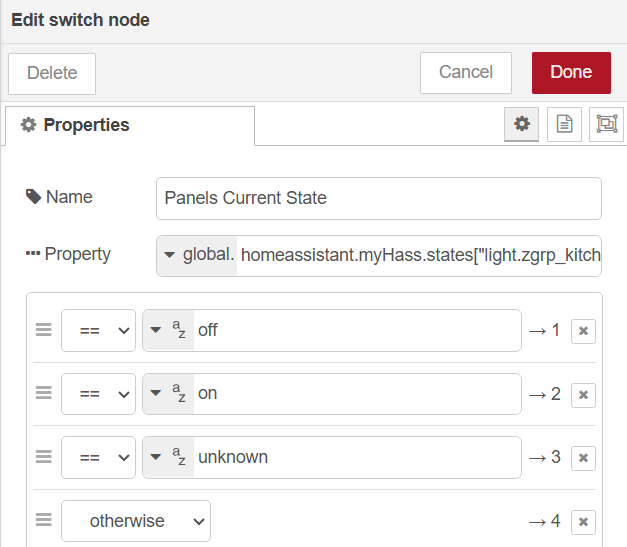
Let’s add another match / route to the “Switch” node, below on and off, to match “unknown” like this.
Then, we can route the new, third, output to a simple toggle on the basis that if the user is clicking the switch, they probably want the light(s) to toggle to the “other” state.
If we replace the simple “Set On Payload” node with a more complex time of day or state of some other lights sub-flow, we’ll just get the light in whatever state it was last time but, at least we’ll get light. Once we have the know state reestablished, the next time we go from “off” to “on” we’ll get the smart stuff again.
The wrap up.
We can use simple logic like this to check the current state of the lights to decide what to do next rather than simply toggling the current state.
We can then route the currently “off” state to a “turn_on” action and vice-versa like this.
This will allow us to take specific actions when we turn on the light, like time of day colour temperature etc. or simply turn the light off if it is currently on.
But, if the MQTT Broker ever loses the previous state, or gets reset, the newly (re)discovered light (or group) will have a state of “unknown”, and the logic shown above will fail. In order to catch the unknow state we need to add a third match to the “Switch” node to catch it like this.
Then, we can route the new, third, output to a simple toggle on the basis that if the user is clicking the switch, they probably want the light(s) to toggle to the “other” state.
This will not be able to switch the lights on with any additional cool logic, but at least it will do what the user intended, even if they’re not wowed by our ninja smart-home skills.
As a bonus, we’ll avoid the “oh why don’t we just have normal lights like normal people!” cry, which is always nice… (did you notice that was a statement/rhetorical question with an exclamation mark/point, and not a question you should ever try to answer at that precise moment in time).